More HTML Tags
Now that we have created a page, let’s back up a bit and talk about some of the most commonly used tags. Tags define HTML elements.
Creating paragraphs
The first tag you need to know how to use is the paragraph element, defined by opening and closing the <p> tags.
With the tags I have shown you so far, you could actually create a web page. It would be boring to look at, but it would be a page that people could read. Let’s add a little bit of interest. I’m going to give you a few more tags to play with. And that is exactly what you should do, by the way, play!
Headings
HTML defines headings with levels from one to six. You use the heading tags the same way as the paragraph tag. The heading tags look like this:
    <h1>This is heading level 1</h1>
    <h2>This is heading level 2</h2>
    <h3>This is heading level 3</h3>
    <h4>This is heading level 4</h4>
    <h5>This is heading level 5</h5>
    <h6>This is heading level 6</h6>
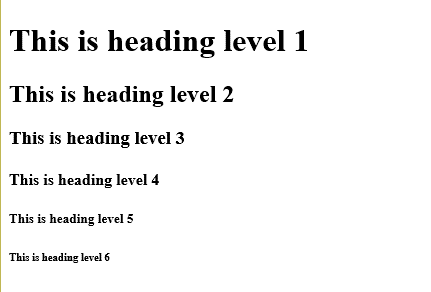
If you were to look at that code as it is rendered in the browser, it would look something like this:

To tell the truth, I’ve seldom gone any further than heading level three, but all six of them are there for your use. Remember that the look of each of these headings can be modified through the use of CSS. What we are looking at here is the default formatting supplied by my browser.
Character formats
Here are some tags you can use to control the look of your text. These tags are used on sections of text within a paragraph or other container. So far you’ve seen the heading tags and paragraph tags; we’ll talk about other containers later.
Here are the text formatting tags:
<em> - The em tag defines text that should be emphasized in some way. You might use it to set off a technical term, for example. Most browsers will render text between the <em> and </em> tag using italics, but once we start working with CSS, you’ll see that you can change that to suit the content of the page.
<strong> - The strong tag indicates text that should stand out. In most cases the text marked as strong will be display in boldface type but this isn’t necessarily so because, as with <em>, you can define other formatting for this tag using CSS. All of the text between the opening <strong> and the closing <strong> will be formatted so that it stands out from the surrounding text.
<small> - Text formatted with the small tag is rendered in a smaller font than the surrounding text. It can be useful for a subtitle, or for information that is less important than the surrounding text.
<cite> - Used to mark the name of a work, such as a song, movie, book, or play. This text is usually rendered as italic.
Your second page
Let’s finish by creating a slightly more interesting web page. Let’s create a page about you! Once you’ve entered the following text, save it. The name “aboutme.html” is a good choice for this one. Don’t forget to replace my placeholder text with your own information! I’ve set off the text you need to change with { and }, the curly braces.
<!DOCTYPE html>
    <html lang=”en”>
      <head>
        <title>About {Your Name}</title>
      </head>
      <body>
        <h1>All About {Your Name} <small>{your email}</small></h1>
        <p>Hi, my name is <strong>{Your first name}</strong> and I have created
          this website to show my skills with HTML. I am a {your job title} and
          am learning HTML in order to expand my skills.</p>
        <h2>My Family</h2>
        <p>{Tell us about your family here.}</p>
        <h2>My Job</h2>
        <p>{Put stuff about your job here!}</p>
      </body>
    </html>
For example, take a look at a screenshot of my “About Irene” page. Notice that the text between <small> and </small> is slightly smaller than the rest of the line. Also notice the extra space between the headings and the paragraphs. That can be changed. When you get to the second on CSS, I will teach you exactly how to do that.
You’ve seen how to create a web page and how to use a handful of HTML tags. In coming sections, we'll expand your knowledge of tags, and show you a little bit about how to make your web pages more attractive.
Exercises
- Create a basic web page that you could use as an "About" page on your website. Include your name and a few paragraphs describing who you are.
- Take the page that you created in Exercise 1 and add some headings. Include multiple heading levels to divide the page into logical sections.
- Look at your page one more time and add a few of the character formatting tags.